Tag: Kat Scrappiness Never Ending Rectangle Dies

  • Boo You!

    Boo You!

    Hi Everyone, it’s Priscilla here. Today I have two Halloween-themed cards that feature two new slimline dies from Kat Scrappiness

    To create Card #1, I first created a slimline base (8.5″ x 3.5″) from yellow card stock. Then I used several bright colors and ink blended a front panel. I know it looks like I had to piece all those rectangles back together, but in reality, I kept all 10 of the nested rectangles connected (did not snip them apart) and ran them through as one piece over the ink blended panel using my Big Shot. Viola!

    I adhered this panel over the card base and then added “boo you” on top. I cut the “boo” from patterned paper using the “Condensed Lower Case Alpha Dies” and the “YOU” from the “I Love You Shadow Die”.

    To finish the card, I added a bat from the “Crafters Essentials-Fall” die collection and some sequins from the “Going Batty Halloween Sequin Mix

    My second card today showcases Kat’s new “Slimline Chevron Coverplate Die“.

    Over a lime green slimline card base, I adhered the “Slimline Chevron Coverplate” die cut that I had layered over a background created with Nuvo “Black Mousse” embellishment paste. I had stained the Coverplate itself with purple ink.

    Again I used the “Condensed Lower Case Alpha Dies” for the “boo” and the “I Love You Shadow Die” for the “YOU.” Sprinkles from the “Eyeball Soup” collection added the finishing touch.

    Thank you so much for stopping by! Don’t forget to check out what’s NEW in Kat’s Shop, and follow my blog and Instagram for more “Kat Scrappiness Amazingness”!

    Priscilla 

    The supplies I used are listed and linked below.

    SUPPLIES

  • Bring on the Coffee……


    Hi Everyone!

    I’m back with a cute gift card project using Kat’s new Layered Coffee Cup die set.  This is a very realistic looking take out coffee cup when it’s all put together.  I love all the options you have for assembling it.  For this card, I chose to use some Doodlebug paper to decorate the the cup and images from the Owl Envelope Art  stamp set to decorate the sleeve and the little gift card holder inside.  I had to turn it into a shaker since the flowers matched Kat’s Mixed Floral sequins.  I have lots to show you!


    To start, I die cut all the coffee cup pieces in white except for the little cup outline and the opening of the cup.  I did the outline in black to give some shadow to the cup and I did the opening in kraft paper to make it look like coffee.  I covered the cup with some Doodlebug Swiss Dot paper and gathered some bright Lawn Fawn inks to stamp the flowers from the Owl Envelope Art stamp set onto the coffee sleeve.


    My 2-way glue pen was helpful in attaching the white outline of the top of the cup to the “coffee”.

    For the inside of the shaker, I wanted to use just the “Coffee” word from the Echo Park But First Coffee stamp set, so I cut apart the “Coffee” from the rest of the sentiment.  It’s easy to do if you’re careful and have sharp scissors.  You can put the words back together again then, and use the stamp as you normally would.

    After stamping the “coffee” on the front of the card in light gray ink, I created the shaker frame using the Neverending Rectangle dies and attached the coffee cup to the front of it.  I poured some of the mixed floral sequins down on the card and adhered the frame over the top with foam tape.

    I stamped “coffee”on the inside of the card as well and added another sentiment from the But First Coffee stamp set.  I stamped it on a Double-Stitched Heart die.

    For the inside of the card, I created a pocket for a gift card.  I first folded a piece of white card stock over the gift card to get the size correct.  I left about a half inch on either side and scored it close to the edge of the gift card.

    I then, snipped across the fold with my scissors to the score line.


    After stamping some flowers from the Envelope Art Owl stamp set as I did on the coffee sleeve, I folded in the snipped edges of the gift card pocket and secured them with Scor Tape.  I then trimmed off the excess with my paper trimmer.


    Here is the finished card inside.

    I added another thin frame to go inside the shaker frame made from gray card stock.  I thought this made the card look a little more “finished” on the outside.

    Thanks for joining me today.  I hope this card has given you some great ideas for using the Layered Coffee Cup die set.  You can purchase this over at the Kat Scrappiness shop and see the “key” for assembling all the parts.  Feel free to use my coupon code: Heidi10 to receive 10% off your order.  I have all the products I used from the Kat Scrappiness shop linked below.  Have a great day!

    Heidi


    https://linkdeli.com/widget.js?1522747088205

  • Peek-a-boo Halloween Shaker Card

    Peek-a-boo Halloween Shaker Card

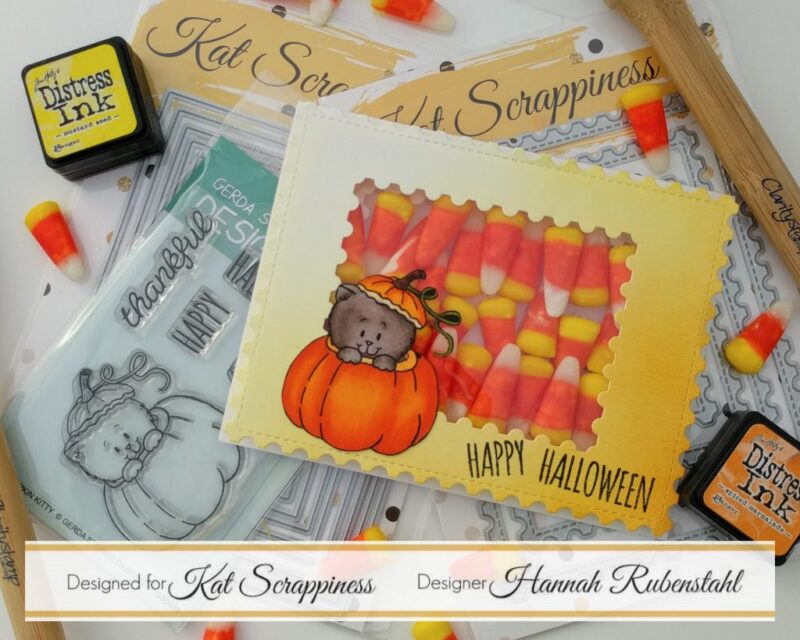
    Hi there! Hannah, from Fanciful Spaces here! I am CRAZY excited to share this card with you! Ever since I successfully used whole coffee beans in my fall coffee blog hop card I’ve been obsessed with shaker cards! I have a million ideas of what I can stick inside a shaker card! Today I’m bringing you one with candy corn! To make it even better, the shaker portion can be seen both on the inside and the outside of the card!

    Here is the front side of my card:

    Here is the inside of my card:

    Isn’t it stink’n cute?!?!?!?! It wasn’t much harder to make than a regular shaker card, I did have to make duplicates of the postage die frame and of the cat in the pumpkin, and I had to cut an opening in my card base. But really, it wasn’t very hard.

    I started by cutting two A2 (5.5″ x 4.25″) sized panels out of my Neenah Solar White 80lb cardstock, using my Clarity Stencil Brushes I dusted Mustard Seed and Spiced Marmalade Distress Inks in a gradient from corner-to-corner.  Then, creating a frame with the Stitched Postage Stamp Rectangular Dies by Kat Scrappiness, and some washi tape, I cut those two pieces. I stamped my sentiment on one piece, using the Peekin’ Pumpkin Kitty stamp set by Gerda Steiner Designs and my Memento Tuxedo Black Ink. Using the same ink, I stamped out the pumpkin/kitty stamp, twice, into some more Neenah Solar White cardstock. I colored this with Copic Markers and then fussy cut it.


    I took my card base, which was Neenah Solar White 110lb cardstock and cut a rectangle opening using the Never Ending Rectangle Dies, also by Kat Scrappiness. On the inside, I used my tape runner to adhere a piece of acetate down, and then the colored frame I had made without the sentiment stamped on it.

    On the front side, I taped a 4 sheet thick frame I built up using fun foam and Scor-Tape. If you are re-creating this card you will have to double check the thickness of your foam with the thickness of your candy corn, both are possibly going to be thicker or thinner than mine. Basically, I wanted my frame to be just as thick as the candy corn was and no thicker. This frame was taped on using more Scor-Tape and then I laid my candy corn inside.

    The next idea was that next I was going to carefully place my card base on top the frame, however, in the video, this is when things went awry. I accidentally adhered the frame on upside down. This was a problem because my sentiment was on wrong! WOOPS! So I had to cut it off of the card base, create a new card base and frame, and layer that on. The result was that this card is a touch thicker than it needs to be, but it really isn’t noticeable with all the other thickness in this card. At the end of the day, my goof wasn’t noticeable at all!

    Once my card front was properly placed on my card base I just used some Ranger Multi-Medium Matte to adhere the Copic pumpkins to both the front and the inside!

    It is so crazy cute and super fun, isn’t it?!?!?! Like I said, you really can’t see where I messed up, no one will ever know except for you and me! 😀

    If you’d like to watch how I made it, watch this video!

    [youtube https://www.youtube.com/watch?v=-E_OzmnL1wA]

    The following is a list of the products I used, you can save 10% on your order by using my discount code Hannah10!

    Neenah Solar White in 80 & 110lbs
    Clarity Stencil Brushes
    Distress Inks
    Stitched Postage Stamp Rectangular Dies
    Peek’n Pumpkin Kitty Stamp Set
    Memento Tuxedo Black Ink
    Never Ending Rectangle Dies
    Acetate
    Fun Foam
    Scor-Tape
    Ranger Multi-Medium Matte
    Copic Markers
    Candy Corn

  • Boo!

    Boo!

    Greetings! Hannah, from Fanciful Spaces, here! I have been SO excited to share this card with you! This card required a few technical moments, but it harbored a lot of glittery fun! I suspect my nephew will really enjoy it when he receives it. 😉

    I was inspired to create this card after I saw a card with a similar cut through the front panel, the other card was more swoopy and gentle, but I wanted something harsh and fierce looking (the other card didn’t use googly eyes either)! Like the other card I saw, whose lines were more or less perpendicular, I wanted the same effect. These perpendicular lines, along with a sharp 90-degree angle, were quite easy to create with the usage of Kat’s Never Ending Rectangular Dies.

    To start I adhered a sheet of Scor-Tape to a piece of Neenah Solar White in 80lbs. I then cut these out, to create a rectangle, with one of the rectangles from the Never Ending Rectangular Die set, I also cut another sheet of cardstock using the same rectangular die. Then I cut two corners of a rectangle at perpendicular lines using two larger dies from the Never Ending Rectangular Dies.


    I was left with 3 separate pieces of cardstock/Scor-Tape.

    For the top and bottom panels of the Scor-Taped piece, I covered them with Nuvo Scarlet Red Glitter. I made sure that I worked on scratch paper, and I had turned off my ceiling fan. I then put another sheet of scratch paper on top of the glitter and pressed it into the Scor-Tape. Using a pair of tweezers I removed the two pieces, shook the glitter off, and then returned the excess glitter to the container. The use of Scor-Tape kept pretty much all of the glitter in place and prevented glitter from flying about my craft room! It was the most mess-free experience I’d ever had with glitter!

    For the middle section, I applied googly eyes, of a variety of sizes, over it. The remaining Scor-Tape that was still visible I covered with Nuvo Charcol Glitter, using a similar technique to the red portions. At this point, I also colored the other sheet of cardstock that I had cut out. I wasn’t 100% sure all of the areas wouldn’t be seen as I layered the glitter and eyes on it, therefore I colored it using Black Soot Distress Oxide.

    Carefully I traced the glitter pieces onto a sheet of scratch paper and used that to make a pattern in order to cut out 2 layers of black fun foam slightly smaller than the glitter pieces. I adhered the fun foam together using Ranger Multi-Medium Matte. When they were dry I used 1/4″ Scor-Tape to stick my glitter pieces onto the fun foam.

    Next, I used VersaMark Ink to adhere WOW! Clear Gloss Embossing Powder to the edges of a sheet of cardstock that was cut to an A2 size (4.25″ x 5.5″). I only needed to emboss about half an inch around the edges. Carefully, I lined up the glitter and eye sections. Once they were in their correct positioning I applied Ranger Multi-Medium Matte to the fun foam of the top section. I let that sit and dry for a bit, keeping it in its correct position was key to line up the eyes and the bottom section when I went to glue them down.

    Kat used to sell die set by a Cheery Lynn Designs, it had this fabulous “Boo” sentiment. She, unfortunately, doesn’t carry it but she DOES have this “Boo” sentiment by Tonic Studios which would work perfectly! I cut my sentiment out of white cardstock and out of black fun foam. Using Distress Inks I colored the sentiment and then doused it with my Wink of Stella pen. When the sentiment was dry I adhered it to the fun foam with Ranger Multi-Medium Matte and then to the glitter panel. This was all adhered to my card base using a tape runner, and Viola, one of my favorite cards ever was created!

    If you liked this project, feel free to use Hannah10 at checkout! The following are the products I used:

    Kat Scrappiness Never Ending Rectangle Dies
    Scor-Tape Sheets
    Nuvo Scarlet Red Glitter
    Nuvo Charcol Glitter
    Black Soot Distress Oxide
    Ranger Multi-Medium Matte
    Scor-Tape 1/4″
    VersaMark Ink
    WOW! Clear Gloss Embossing Powder
    Boo – Tonic Studios
    Wink of Stella
    Googly Eyes
    Neenah Solar White in 80 and 110lb

  • Mr. Bossy Pants

    Mr. Bossy Pants

    Hi everyone this is Mona back with a fun card featuring one of Kat Scrappiness’ new die sets.  I must say this is one of my favourites, it’s called Never Ending Rectangle Die Set. I really love the look of all those layers, it makes me happy ?

    I started out my card by cutting out my card base at 51/2″x41/4″. I picked three my papers that I wanted to layer and then die cut all my rectangles, 9 of them to be more specific starting with the largest one. I really love that colour combination. I proceeded by adhering all my layers using my atg gun which I needed to refill using 1/4″ Acid free ATG tape.

    I adhered all the layers except the top one so I could stamp more easily using the giraffe from my Gerda Steiner stamp set called Go Wild  and my Jet Black ink from Lawn Fawn. The sentiment is from a stamp set that I had in my stash. I then used my alcohol markers to colour my giraffe and adhered it to the top of the card.

    This completes my card for today, thanks for stopping by and see you again soon. I have included the link to the Kat Scrappiness store to be able to check out all her new supplies she has in the store.

    https://www.katscrappiness.com/