Tag: design team projects

  • Kat Scrappiness Essentials May 2023 Release

    Kat Scrappiness Essentials May 2023 Release

    Hello friends and welcome to the Kat Scrappiness May Release 2023. This release includes such fun essential dies to add to your crafting projects.

    Be sure to join the Instagram Hop beginning at Noon EST May 20th. #KSESSENTIALSRELEASE2023

    VIDEO INTRODUCTION Essential Dies by Kat Scrappiness


    Are you ready to get inspired?  Have fun browsing through all of the beautiful projects prepared by the design team! 

    Thank you to our Blog and Video Creative Crew for your awesome projects!!!


    BLOG TEAM MEMBER- CRYSTAL

    Products Used:

    Products Used:


    BLOG TEAM MEMBER – DONNA I

    Products Used:

    Products Used:


    VIDEO TEAM MEMBER- JANET
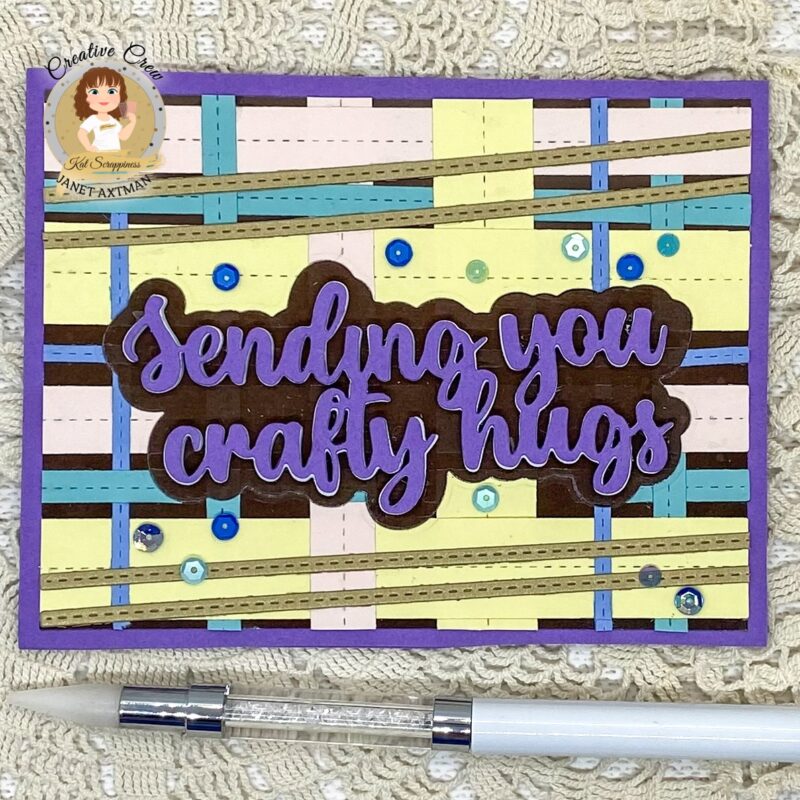
    Products Used:

    Products Used:


    VIDEO TEAM MEMBER- LINH

    Products Used:

    Products Used:


    BLOG TEAM MEMBER- PRISCILLA

    Products Used:

    Products Used:


    BLOG TEAM MEMBER- REVATI

    Products Used:

    Products Used:


    BLOG TEAM MEMBER- SAMMI

    Products Used:

    Products Used:


    BLOG TEAM MEMBER – SHERI

    Products Used:

    Products Used:


    VIDEO TEAM MEMBER- SUZANNE

    Products Used:

    Products Used:


    VIDEO TEAM MEMBER -TASHA

    Products Used:

    VIDEO TEAM MEMBER -TINA

    Products Used:

    Products Used:


    VIDEO TEAM MEMBER- YVETTE

    Products Used:

    Products Used:

    Would you like to win the prize from Kat Scrappiness?

    *U.S. residents only but if international winner is chosen, winner will have to pay for shipping).

    Here’s how to enter:

    • Comment below on this blog post
    • Head over to Instagram and follow Kat Scrappiness.  You must be a @KatScrappiness follower to be eligible to win.
    • Follow the hop using the tag #KSESSENTIALSRELEASE2023.  Then, visit each member’s link and comment on their posts.

    Winner will be announced on @Katscrappiness on May 27, 2023

    Giveaway is Open to all. Please don’t follow and then unfollow afterward, that’s unkind. Giveaway accounts do not qualify. Per Instagram rules, we must mention this is in no way sponsored, administered, or associated with Instagram or Facebook. By entering, entrants confirm they are 13+ years of age, release Instagram or Facebook of responsibility and agree to their terms of use.
    Good Luck and Happy Hopping!
  • 5 x 7 Thanksgiving Card Featuring Dress Up Quokkas

    5 x 7 Thanksgiving Card Featuring Dress Up Quokkas


    Kat Scrappiness, thanksgiving, DT project, Nicki Hearts Cards, card making, 5x7

    Hi, everyone! I am here today with my first blog post as a DT member. I am Nicki Baxley of Nicki Hearts Cards and I am so excited to be a part of the team! Today, I will be using the new 5 x 7 dies and the dress up quokkas. I created a video with the entire process, so check it out for all the details.

    Here’s one more picture of the final product!

    Kat Scrappiness, 5x7 cards, thanksgiving quokkas, Nicki Hearts Cards, card making

    Check out these links below to go to the Kat Scrappiness shop and view the products used in the video!


    https://linkdeli.com/widget.js?id=f5e8378456858c916708


  • February Release Day 3 – Star Fusion Coverplate

    February Release Day 3 – Star Fusion Coverplate

    It is the last day of our February product release.  I hope you were able to check out the first two days of the reveals.  Which die is your favorite so far?  Don’t forget to leave a comment if you haven’t done so already for a chance to win the dies.  For our projects today, the design team is showcasing the Star Fusion Coverplate die.  Here’s what it looks like:


    Here are the samples made by the design team.


    CAREN BATHOLOMEW


    Caren used the Star Fusion coverplate die to die-cut the blue glittered card stock and adhered this piece on her card base.  She also adhered another pink card stock behind the die-cut.  She added two hearts to finish the design and stamped her sentiments.  What a cute Valentine’s Day card.


    LISA GOLZBEIN


    Lisa die-cut the star fusion die on some blue card stock and adhered it on a kraft card base.  She also used the Lola The Giraffe stamp set from the shop and stamped her sentiment using the Stiched Sentiment strip die.  What a cute card!


    MARIA RUSSELL


    I die-cut the Star Fusion Coverplate die with some white card stock and adhered this piece on some white card base.  I have been loving the clean white-on-white look lately.  I die-cut the flowers and the branches using some dies that I have from my stash and colored the branches with some Copic markers.  I stamped the flowers with some lawn fawn inks to give it some dimension and adhered and layered these pieces on my card.  I die-cut the script sentiment “Thanks” on some black card stock and vellum using the Paper Rose dies.  I also added some Sparkling Clear Jewels to finish my design.  Clean and simple!  Here’s a closer look:


    MARTHA GOMEZ


    Martha created TWO gorgeous cards today with the star fusion coverplate die.  Please check out her post this month to find out how she made her cards.


    PRISCILLA JOSEPH

    Priscilla created quite a few samples for you  guys today.  She definitely outdid herself this month.  Get ready to be wowed!


    TINA GUIGUI DORNBAUM


    Tina created this heavenly card using a lot of products from the shop.  She inked up her background with some distress oxide inks and used a clouds stencil die.  She die-cut a yellow piece of card stock using the Star Fusion Coverplate and used her distress oxide to add more texture and color.  She used the Lacy Layered Heart Die to die-cut the window and adhered this piece on her card base.  She stamped and colored the flowers and vase using the Happy Fall Y’All stamp set.  To finish her design, she stamped her sentiment using the Stitched Sentiment Strip dies and adhered some jewels to her card.  What a beautiful card, Tina!


    For Tina’s second card, she inked up her background again with some distress oxide inks and adhered this piece on her card base.  She die-cut some white card stock using the Star Fusion Coverplate.  She stamped some coffee images from a Lawn Fawn stamp set and colored it with alcohol markers.  Added the sentiment “You’re The Cream to my Coffee” and some Pink Jewels to finish her design. Another beautiful card, Tina!


    HOW TO WIN:

    WOULD YOU LIKE TO WIN THE STAR FUSION DIE?  Leave a comment everyday during the reveals in the comments section below for a chance to win the die.  Deadline to leave a comment is on Friday, February 8, 2019.  Winners will be announced on the blog on Saturday, February 9, 2019.  I hope you love the projects as much as I do.  This Star Fusion Coverplate die is now available for purchase here –> http://bit.ly/2DZnVLn


    There you go Kat Scrappiness fans!  I hope we have given you some inspiration this week!  Have an amazing day and happy crafting!


  • February Release Day 2 – Mandala Die and Mandala Frame

    February Release Day 2 – Mandala Die and Mandala Frame

    Good morning Kat Scrappiness fans!  Are you ready for Day 2 of the February reveals?  For our projects today the design team is showcasing the Mandala Die with the Mandala Frame.  These dies will either go perfectly well together, layered or used on its own.   We also have a giveaway everyday during the release so scroll down at the end of the blog post to find out how you can WIN these dies.


    Mandala Die


    Mandala Frame


    Here are some samples created by the design team:


    CAREN BARTHOLOMEW


    Caren inked up the background with some distress oxide inks and die cut another piece of some white card stock using the Mandala die.  She adhered this piece on top of her inked background and stamped her sentiment using the same ink for a seamless look. Simple and elegant!


    In this card, Caren used the Mandala die as a stencil and inked up the card stock with some distress oxide inks.  She finished her design by adding the sentiment script  “Hello Friend” from the shop.


    LISA GOLZBEIN


    Lisa had cut the Mandala Frame with a light blue card stock.  She die-cut the Mandala die using some white card stock and adhered both on her card base.  She colored a cute critter and used the Hello from the “Hello My Crafty Friend” sentiment script die.  How adorable is this card?


    For Lisa’s second project, she used both the Mandala Frame and Mandala dies again and added the coffee cup image from the Let’s Get Caffeinated stamp set.  She also used some Brown Jewels to finish her design.


    For Lisa’s third card, she created a square card using the Mandala die and adhered the “love” sentiment using the I Love You Shadow dies, just released last month.


    MARIA RUSSELL


    I used the Mandala die as a decorative background for my card.  Even though it is not the focal point, the die-cut pieces really stood out on this card.  I die-cut the Mandala die twice with some white card stock and adhered them onto a light beige card base.  I stamped the flowers with different lawn fawn inks available at the shop and die cut using the coordinating dies.  I heat-embossed the sentiment with white embossing powder and die-cut the globe using the dies.  The stamp set I used is called Globe Greetings from Concord & 9th.  I finished my design by adding some Pink Sparkling Jewels from the shop.  Here’s a closer look:


    I die-cut the Mandala frame on some white card stock and adhered this piece on a blue card base.  I stamped my celestial background on another piece of Neenah solar white card stock with some Lawn Fawn inks and die-cut this piece using the Cross Stitched Circle frame die.  I adhered this piece in the middle of the Mandala frame and finished my design by adding my critters and Sparkling clear jewels from the shop.  I didn’t think this card needed a sentiment in the front.  Here’s a closer look:


    MARTHA GOMEZ


    Martha created this beautiful card using both the Mandala Die and the Mandala Frame.  She inked up her background using distress oxide inks.  She die-cut the Mandala Frame from some white card stock and adhered this piece on her inked background.  Martha inked up another piece of card stock and die-cut this piece with the Mandala die.  She adhered this piece on her card.  She finished her design by stamping her sentiment on the Stitched Sentiment Strip die.  What a beautiful card, Martha!


    PRISCILLA JOSEPH


    Priscilla had die-cut the Mandala die and used another die from Papertrey Ink to make it look like the moon.  This card is so beautiful and unique!  She also used the “Love You to the Moon and Back” sentiment strip die and finished her design with some sequin mixes from the shop.  Here’s a closer look:


    Priscilla created two birthday-themed card for her second and third project using the Mandala Frame die and Mandala die.  She also used the Happy Birthday script sentiment die with some Superhero Star Sprinkles Embellishment to finish the card design.   Priscilla, you outdid yourself this month with all of your projects!  Wow!


    TINA GUIGUI DORNBAUM


    Tina created this beautiful and elegant card by coloring some Yupo paper with alcohol inks and die cut the same with the Mandala frame die.  She adhered this piece on a white card base and die cut the Mandala frame die with white card stock.  She finished the design by adding her sentiment using the stitched sentiment strip die.


    HOW TO WIN:

    WOULD YOU LIKE TO WIN THE MANDALA DIE AND THE MANDALA FRAME?  Leave a comment everyday during the reveals in the comments section below for a chance to win the die.  Deadline to leave a comment is on Friday, February 8, 2019.  Winners will be announced on the blog on Saturday, February 9, 2019.  I hope you love the projects as much as I do.   The dies are available for purchase now


    Mandala Frame: http://bit.ly/2MT4aYq

    Mandala Die: http://bit.ly/2MQBFe2


  • February Release Day 1 – Medallion Coverplate Die

    February Release Day 1 – Medallion Coverplate Die

    Hello Kat Scrappiness fans! It is day 1 of the February product release and today, the design team is showcasing the Medallion Coverplate Die.  We are also having a giveaway everyday during release week so please scroll down at the end of the blog post to find out how to WIN this Medallion Coverplate die.  The design team has been super busy creating the samples for you.  We will not have a blog hop at this time but you will be able to see how they created their projects all throughout the month of February so please stay tuned.  Some of the girls are even planning on posting a YouTube process video.  Are you ready to see the Medallion Coverplate Die?  Here’s what it looks like:


    Here are some amazing samples by the design team.


    CAREN BARTHOLOMEW


    Caren created this super cute Valentine’s Day card with the new coverplate die and did some inlaid technique.  She used the stitched sentiment strip die for her Happy Valentine’s Day sentiment. What an awesome card, Caren!


    Caren created another card using the medallion coverplate and die-cut a scalloped circle as her focal point.  She also used the Give Thanks sentiment from the Happy Fall Y’all stamp set and added the fall leaf and some sequins to adorn the card. Wow!


    LISA GOLZBEIN


    Lisa did some ink-blending on her card stock with some distress oxide inks in pastel colors, and die cut the same using the medallion coverplate.  She also used the Thank You script sentiment die and added some jewels to finish her design.  So beautiful and perfect for Spring.  Here’s a closer look:


    MARIA RUSSELL


    I created a love-themed card.  I die-cut the medallion coverplate from some 110 lb card stock and adhered acetate sheet.  I added the foam adhesive to create the well and used the Golden Anniversary sequins as my shaker element.  I adhered this piece onto a white card-base and added an image from a stamp set from my stash.  I also used the new Stiched Sentiment strip die and heat-embossed the sentiment and adhered this strip on the center of my card.  Here’s a closer look:


    I created this simple card by die-cutting a tiffany-blue card stock using the coverplate die.  I stamped the sentiment from Virginia Turtle stamp set (purchased from the shop awhile back) using Versafine ink.  I added the black bow using a Penny Black die set.  I finished the design by adding some Sparkling clear jewels from the shop.  Doesn’t the black bow remind you of the outfit by Audrey Hepburn in the movie, Breakfast at Tiffany’s? Here’s a closer look:


    MARTHA GOMEZ


    Martha used the Medallion coverplate die and cut it in half.  She adhered the die-cut on top of a green background using foam adhesive and stamped her sentiment on the stitched sentiment strip die.  To finish her design, she added the red heart.  Here’s a closer look:


    PRISCILLA JOSEPH


    Priscilla created this gorgeous Valentine’s Day card with the Medallion Coverplate as her background.  She stamped and heat-embossed the heart wreath using the Floral Heart stamp set by Neat and Tangled.  To finish her design, she added some Fuschia Jewels.  Here’s a closer look:


    Priscilla used the Medallion Coverplate die with the Cross Stitched Rectangle dies and a stamp set from Papertrey Ink called “Glorious Globes”.  I love the tone on tone background that she created on her card.   Here’s a closer look:


    TINA GUIGUI DORNBAUM


    Tina created this beautiful card by inking up her background with distress oxide inks and die-cut the piece using the coverplate die.  She adhered this piece onto a black card stock to make the colors pop!  She stamped the sentiment with versamark ink and heat embossed with white embossing powder and added some sequins to finish her design.  I love the colors that she used!


    Here’s another card from Tina but this time, she colored the background instead of the die-cut and added a very colorful butterfly as her focal point.


    HOW TO WIN:

    WOULD YOU LIKE TO WIN THE MEDALLION COVERPLATE DIE?  Leave a comment everyday during the reveals in the comments section below for a chance to win the die.  Deadline to leave a comment is on Friday, February 8, 2019.  Winners will be announced on the blog on Saturday, February 9, 2019.  I hope you love the as much as I do.  This Medallion Coverplate die is now available for purchase here –> http://bit.ly/2MQXcn4


    Happy crafting!

  • Winners of the January Product Release

    Winners of the January Product Release

    Hello Kat Scrappiness fan! Since we released 4 products this week, I decided to pick four (4) winners!  I am back today to announce the lucky commenters! To give everyone a chance, winners were randomly picked through www.random.org.

    WINNERS, please leave your email addresses on the comments section below. Kathleen will be contacting you for your mailing address so she can send you the prize. Are you ready? Here are the winners:

    Lacy Layered Heart Die – Dumontier Marjorie

    Stitched Sentiment Strip Dies – Arianna Barbara

    I Love You Shadow Dies – Andre M.

    Say it with Hearts stamp set – Meghan Kennihan

    I’d like to take this opportunity on behalf of Kathleen and the rest of the design team to THANK YOU ALL for showing your support during our release week. We will be doing this again next month so please stay tuned. I hope you all have a wonderful weekend and happy crafting!

  • Wishing You Peace, Love & Joy by Maria

    Wishing You Peace, Love & Joy by Maria

    Hello everyone!  Maria here on the blog today.  Have you joined our Blog Hop to benefit the Coffee Oasis Youth Program?  Collection is currently open and all you have to do is make a winter-themed project and link it on the site, or leave comments on each participants blog and you will also have a chance to WIN!  Simple as that!


    For my card today, I am showcasing the new Stitched Snowflake Swirl Border Background die and other products available at the shop.   I started out by die-cutting a piece of some Bristol smooth white card stock using the Stitched Snowflake Swirl Border Background die.  I inked up this piece with Spun Sugar and Antique Linen distress oxide inks with my mini-ink blending tool.


    Using the Holiday Style stamp set from Sunny Studio Stamps, I stamped the pine boughs first, then positioned the silver bell ornament and stamped it with different gray and black inks.  I also stamped it with some Encore silver pigment ink.  I die-cut a piece of red  bow using a die-set from Lawn Fawn and adhered it onto the top of the ornament.  I also stamped the sentiment using Versafine Onyx Black ink and Lawn Fawn Lobster ink.  I added the Sparkling Clear jewels using my Crystal Katana jewel picker.


    Here’s my card:


    I absolutely LOVE the stitching details made by the die.  It is so beautiful in person.  I also LOVE the jewels that are available at the shop but the sparkling clear ones are my favorite.  Here’s a little close-up:


    In my opinion, Kat Scrappiness makes the most beautiful and affordable dies.  I can’t even pick a favorite because I love them all!  Please tell us which one is your favorite die from the shop.


    I hope you like my card today.  The supplies I used are listed and linked below.  Don’t forget to use my coupon code “MARIA10” for 10% off your order.  Thank you for stopping by and happy crafting!


    ———–SUPPLIES———-


  • I Love You More Than Chocolate Dad

    I Love You More Than Chocolate Dad

    Hello Kat Scrappiness fans!  Maria here with you today sharing this Father’s Day card, showcasing the Condensed Uppercase Alphabet Dies, the Layered Chocolate Bar 6×8 stamp set, the Chocolate Lover’s Sentiment stamp set and the Fancy Scalloped Stitched Border Dies.


    I struggle with Masculine cards but I like how this one turned out.  I stamped the chocolate images on Neenah solar white card stock, using 3 different brown inks.  I die-cut a piece of patterned paper using the Gotta Have Gingham 6×6 patterned paper by Lawn Fawn with the larger die from the Fancy Scalloped Stitched Border dies.


    I wanted to do a ghost die-cut technique so I die-cut my stamped background using the Condensed Uppercase Alphabet Dies.  I adhered the background onto my card base and adhered the letters with foam adhesive to give it dimension.  To finish my design, I stamped the sentiment on the foreground.  Since this is a masculine card, I didn’t really add anything else to it, which is really tough because I normally embellish my cards a lot.  Here’s what it looks like:


    I hope you like my card today.  I am sorry for being a bit M.I.A. on the blog or on YouTube.  I am in the process of moving my household stuff from overseas, back to FL and I have been crazy busy lately.  You will be seeing more posts and videos once I am settled in.  Thanks for supporting Kat Scrappiness and for liking our videos and blog posts.   The supplies I used are listed and linked below.  Have an amazing day!


    ———–SUPPLIES———–


    https://linkdeli.com/widget.js?1525438185447

  • Chocolate Shaker Card by Maria

    Chocolate Shaker Card by Maria

    Are you looking for a simple Valentine’s Day card without all the hearts and romantic stuff? Or just a simple “just-because” card to brighten someone’s day?  For my project today, I am showcasing the Layered Chocolate Bar 6″ x 8″ stamp set, the Chocolate Lover’s Sentiment stamp set, Sparkling Manhattan sequin mix, Distressed Edge Rectangle dies and the Wonky Wavy Stitched Rectangle dies.

    I started out by stamping the layered chocolate bar stamp using my Tim Holtz Tonic stamp platform with my memento tuxedo black ink.  I used my precision-cut scissors to fuzzy-cut the images.

    IMG_6823

    I also cut the little chocolate squares to add to my project.

    IMG_6824

    It has been awhile since I made a shaker card so I thought I’d make them today.  I die-cut my 110 lb. white card stock with the wonky wavy stitched dies.  I die-cut the middle using the second of the largest piece of the distressed edge rectangle dies to create the window.

    I cut a piece of acetate to cover the window and adhered the chocolate bar at the bottom left side corner.  I added some 3M foam tape.  I decided to use my Cinnamon Swirl Mix sequins for my shaker element and the chocolate squares but since the sequin mix I used is not available anymore at the store, you can also use the Sparkling Manhattan sequin mix.  to finish the design, I stamped my sentiment using my Worn Lipstick Distress Oxide ink to give it a little bit of color.

    Here’s the close-up of the card:

    IMG_6821

    I love this stamp set because the chocolate image looks so realistic!  There are so many possibilities using this stamp set.

    KatScrapChocolate11

    I hope you all got inspired to create this simple “Just-Because” card, or a “non-romantic” Valentine’s Day card that you can give to a friend to brighten up their day!  I have listed and linked the supplies I used below.  Thanks for stopping by today and have a wonderful day!

    Maria Russell Signature Logo

    —————SUPPLIES—————-


  • More Chocolate Lover’s Card Kit Projects With Heidi

    More Chocolate Lover’s Card Kit Projects With Heidi

    Hi Everyone!

    It’s Heidi and I have a few more projects featuring the new Kat Scrappiness Chocolate Lover’s Card Kit.   This is such an easy kit to work with and so many options!

    I created this tag using the Wonky Wavy Hearts die addition along with other supplies from the main kit.

    After die cutting the largest heart from white, I created a shaker opening by die cutting the two smaller hearts together using the red cardstock.

    I filled the big heart with some of the heart-shaped sequins from the kit and closed up the shaker window with vellum and foam tape and placed that on top.

    I punched out the “love” from the white tag that’s included and added that along the bottom

    For this card, I covered the front of a plain notecard with some of the patterned paper included in the kit.  I opted for a white chocolate bar version this time.  To stamp the chocolate bar, I used the white cardstock as the base and only stamped the second and third layer stamps.  I used Hero Arts Soft Vanilla for the 2nd stamp and Memento Desert Sand for the 3rd stamp.  The doilies and some die cut pieces frame the chocolate bar.

    Another clean and simple card using the rich chocolate-brown cardstock and a glimmery heart sticker.   Just a note, if you’re looking for ink ideas to stamp your chocolate bar, the Kat Scrappiness shop now carries the Altenew Coffee Break Mini Ink Pad Cube set.  Perfect browns for all the layers!

    For this card, I used the negative of the largest Wonky Wavy Stitched Heart Die along with the patterned paper that comes with the main kit.  I’m saving the “positive” for another project…….I added some shimmer from a Spectrum Noir clear sparkle pen to the “sweet” sentiment die cut along with some sequins and a heart from the die cut pack.

    Be sure to head over to the Kat Scrappiness shop to get your card kit while they are still available.  Feel free to use my coupon code Heidi10 for 10% off your purchase.  Thanks so much for joining me and have a great day!


    SUPPLIES:

    Kat Scrappiness Chocolate Lover’s Card Kit

    Kat Scrappiness Wonky Wavy Stitched Heart Dies

    Kat Scrappiness Chocolate Lover’s Sentiment stamp set

    Tim Holtz Tonic Stamp Platform

    Spectrum Noir Clear Overlay Sparkle Marker

    Wow Opaque Bright White Embossing Powder

    Versamark Ink

    Embossing Magic Bag