Tag: Clear Solid Round Confetti Mix

  • You Are A KOALA-TY Friend

    You Are A KOALA-TY Friend

    Happy Monday Friends!

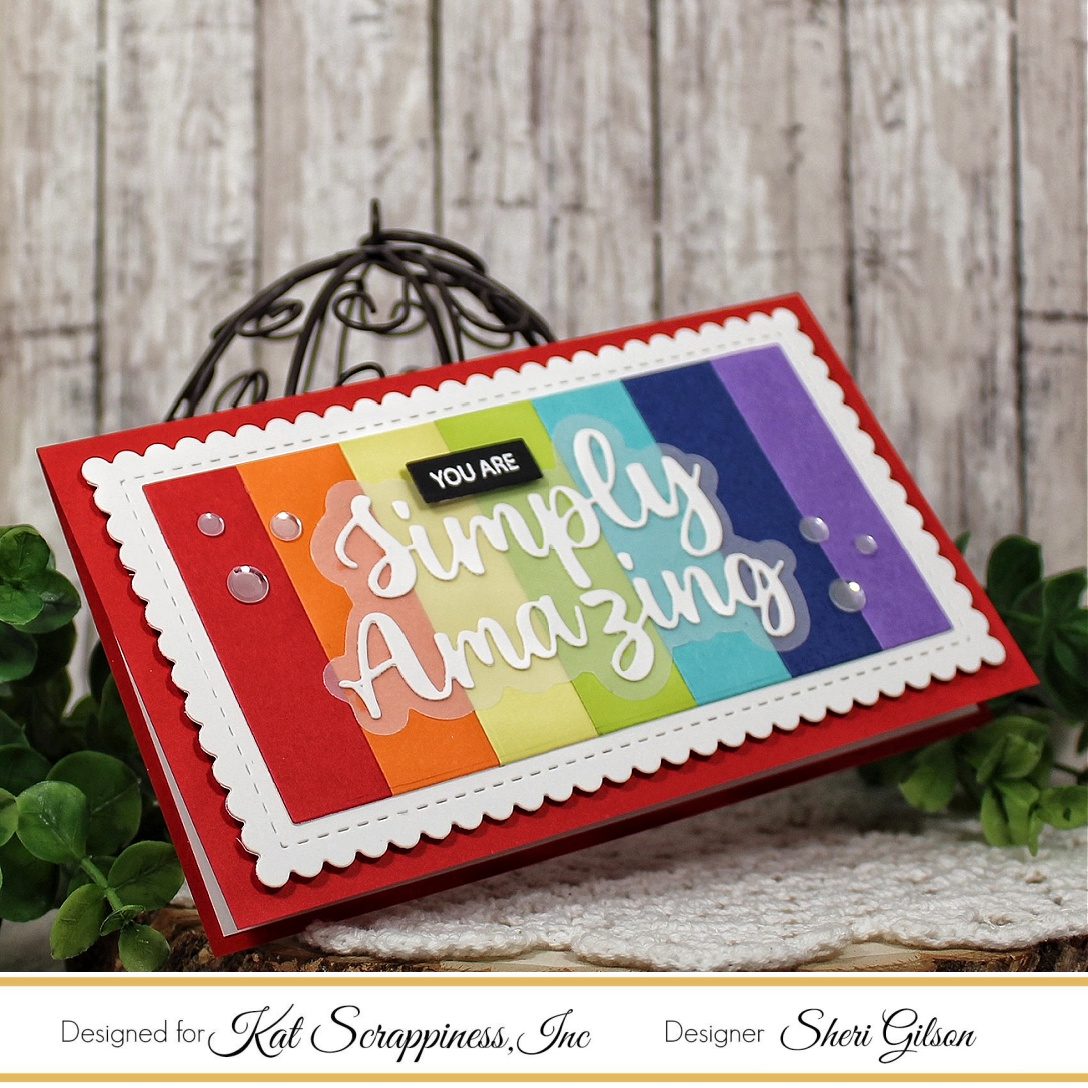
    It’s Sheri here today with a FUN Friendship card featuring the adorable KOALA-TY Time stamp set along with the A2 Postcard die. I thought that I would try a little something different and use the A2 Postcard as the backdrop to my card instead of a plain white panel. The card size is a bit larger to allow me to add a mat and card base, the final card size measures 5 7/8″ x 4 5/8″.


    Steps to Create Card:

    • Cut & Create a Kraft Card Base: 5 7/8″ x 9 3/16″, scored at 4 9/16″ on the 9 3/16″ side.
    • Cut Black Mat: 5 5/8″ x 4 3/8″.
    • Cut White A2 Postcard die: 5 1/2″ x 4 1/4″.
    • Cut Smallest Postage Stamp from the Stitched Postage Stamp Edge die set: 1 1/2″ x 1 1/8″.
    • Cut a small Red heart from the Heart Donut Builder die set: 9/16″ x 7 /16″.
    • Stamp greenery image around the postcard and then color with your favorite coloring medium. I used copic markers.
    • Lightly ink blend the edges of the post card and the postage stamp with kraft ink.
    • Stamp Koala image, color and fussy cut out.
    • Cut out the word Hello with the Hello Crafty Friend Word die with shadow using black card stock. You will have to snip the bottom where it connects to the word crafty to separate.
    • Stamp and emboss “You Are A KOALA-TY Friend” with white embossing powder onto a piece of black card stock and trim into a strip using the Boxed Sentiment Strip dies.
    • Assemble Card. (I added foam tape to little heart, postage stamp, Koala image and sentiment strip for some added dimension…this is optional)
    • For embellishment I added a few Clear Solid Round Confetti sequins using the Jewel Picker and Bearly Art Glue.

    Here’s a list of the supplies I used from the store.
    Affiliate links are used at no additional cost to you. Thank you so much for your support!


    Today’s the LAST DAY to take advantage of the <strong>DIE SALE!

    Click HERE to SHOP!

    Happy Stamping!!

  • How to Make an Infinity Shaker Card

    How to Make an Infinity Shaker Card

    Hi, everyone! This Nicki from the design team here with some tips and tricks on making infinity shaker cards. Check out the YouTube video for all the details!

    Let’s start with what we need to make the card today. All of these items will be listed at the end of the post.

    Kat Scrappiness, spring fling, proud of you, Nicki Hearts Cards

    First, I cut the card stock to 4.25 x 5.5 inches. Next, I carefully slid the card stock into the large Avery Elle Stamp Pocket. Then I made a fold with the bone folder.

    Next, I added the shaker element. Don’t forget to do this before sealing the pocket!

    Once the shaker element is in place, it’s time to seal the pocket with double sided tape. With the pocket sealed, all that is left to do is add the sentiment and the black card stock backing.

    Nicki Hearts Cards, card making, card making ideas, spring fling, graduation card

    I hope you enjoyed this project! For all the details, check out the YouTube video. All the items used in today’s video are listed and do contain an affiliate link. Make sure to click on the links below if you are shopping soon. Happy Crafting!


    https://linkdeli.com/widget.js?id=f5e8378456858c916708

  • You Are Simply Amazing

    You Are Simply Amazing

    Happy Saturday Everyone!

    Sheri here today with a FUN Rainbow Mini Slimline card featuring the NEW Simply Amazing Sentiment w/shadow die and Boxed Sentiment Strips dies from the October 2021 Release!

    Steps to Create Card:

        • Cut Red Card Base 6″ x 3 1/2″ (6″ x 7″, score at 3 1/2″ on 7″ side).
        • Cut White Inside layer 5 7/8″ x 3 1/4″
        • Cut White Scallop panel using from the Scalloped Edge Mini Slimline die ( use larges die: 5 11/16″ x 3 1/8″
        • Cut Rainbow strips (red, orange, yellow, green, aqua, blue, & purple) using the 3/4″ wide strip from the Boxed Sentiments Strips die. Now attach them to a piece of printer paper and you will then cut out using the Never Ending Mini Slimline die (5″ x 2 1/2″).
        • Cut Simply Amazing Sentiment w/shadow out of white card stock & vellum. You will glue the white word cut out to the vellum shadow panel.
        • Heat Emboss “You Are” sentiment from the Hearty Greetings stamp set on a pieced of scrap black card stock with white embossing powder. You will then cut it out with the 3/8″ wide Boxed Sentiments Strips die.
        • Assemble card.
        • For embellishment I added  a few Clear Solid Round Confetti Mix.

    Here’s a list of the supplies I used from the store.
    Affiliate Links used at no additional cost to you. Thank You so much for your support!


    To SHOP SALE,click HERE!

    Happy Stamping!!