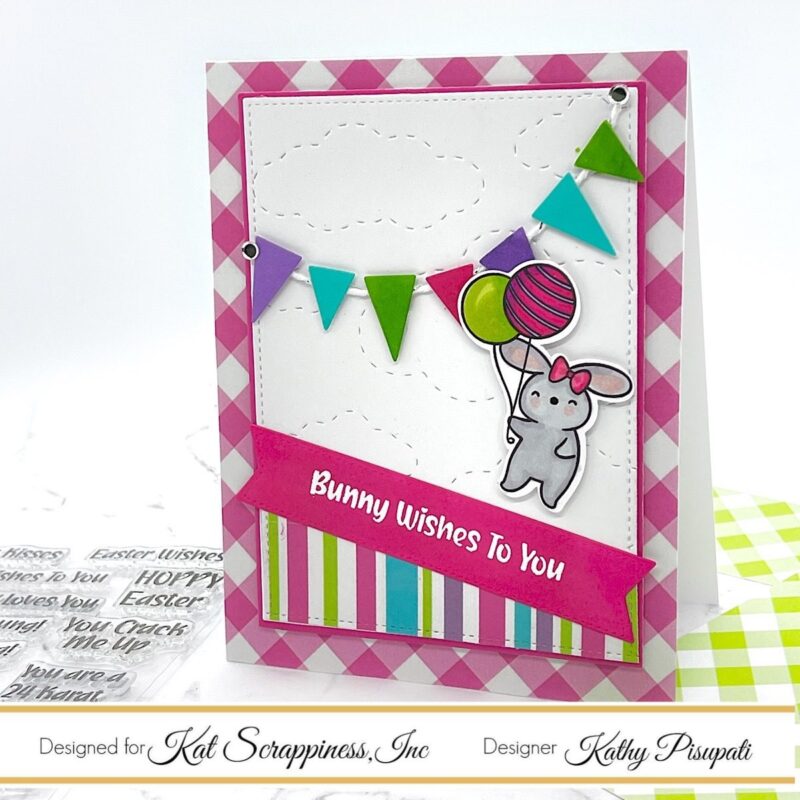
Good Morning! Kathy here from the Kat Scrappiness Design Team. Check out the Kat Scrappiness Blog for some inspiration from me. Today I am sharing the March Release from Kat Scrappiness! It is full of bunnies and they are adorable. The new paper pack is bright and bold and can be used for more than just Easter with the fabulous new sentiment set. This is a release that will be part of my stash for a long time to come, it is just THAT cute! Today I am making a birthday card and am thrilled that you are here to join me. Let’s get started!

Card Supplies
- Hippity Hoppity Bunnies Stamp Set
- Hippity Hoppity Sentiments Set
- Hop Into Easter Paper Pack 6 x 8
- Birthday Essentials Die Set
- Stitched Cover Plate Background
- Silver Round Confetti
- Colored Card Stock
- Neenah Classic Crest Solar White 110lb Card Stock
- Embossing Powder Tool
- White Pigment Ink
- White Embossing Powder
- Heat Gun
- Misti Stamping Platform
- Foam Tape
- Glue
- Paper Trimmer
Card Details
- Cut, score, and fold a top-folding A2 card base from the Neenah Classic Crest card stock.
- From the Hop Into Easter paper Pack select your pattern paper and cut to 4.25″ x 5″.
- Cut a coordinating piece of colored card stock 3.75″ x 4.5″.
- Cut your patterned paper 1/8″ smaller on both sides.
- Cut another panel 1/8″ smaller from the white card stock.
- Use the Stitched Cover Plate die with the white card stock and run it through your die-cut machine.
- Layer the patterned paper and the die-cut panel together and with a paper trimmer cut at a diagonal about 1.5″ up from the bottom. This will leave you with two panels that you can use for two cards.
- Glue the die-cut panel and the patterned paper panel to the colored card stock panel as shown below.
- If there is a small gap no worry as we will cover this with the sentiment.
- Stamp and fussy cut (I used my Brother Scan N Cut) the balloon bunny image. Next, color your image. I used colors that coordinated with my patterned paper.
- Now it is time for the sentiment. When stamping I always use a stamp platform. If I don’t I can guarantee the sentiment will be crooked. However, if you have a steady hand and a juicy ink pad go for it! (light pressure though!) Select a coordinating piece of card stock for your sentiment. Use the Kat Scrappiness Embossing Powder Tool and brush the anti-static powder onto the card stock. With white pigment ink stamp your sentiment. Add embossing powder and heat with your tool.
- Then I used a flag die to cut my sentiment but your paper trimmer will do just fine. You can always create a flag with scissors.
- For the flag banner, I cut the little flags from the Birthday Essentials Die Set from coordinating card stock. Because I wanted a perfect curve for the string I used a circle die to help. So here is a tip…
- Use a circle die and tape it down where you want the banner on the cloud background. Next, add glue along the edge of the circle die then press your string into place. After a few seconds, slowly remove the die. (and clean off the glue!)
- After the banner string had dried, the tiny flag pieces were added with a tiny bit of foam on the bottom and a line of glue on top.
- I trimmed down the string and added two silver round confetti for a finished look.
- The bunny was popped up with foam tape and glue (for the bit over the banner).
- The sentiment flag was added with glue.
- The main panel adhered to the patterned paper panel with foam tape. Finally, the whole thing was added to the card base with double-sided adhesive.
That’s it the card is done. There are a few fussy bits of cutting and die-cutting here but super simple to do. As always, thanks for stopping by and creating this card with me. I appreciate all of you. Please stop by the Kat Scrappiness Store and get these bunnies while they last! Have a wonderful day!
No Comments