Hi there! Hannah, here, with another Kat Scrappiness project!
Kat seems to have a huge love of coffee. She and her design team participate in several “coffee” themed blog hops throughout the year it seems, and she has a whole section in her shop dedicated to Coffee Themed Products.
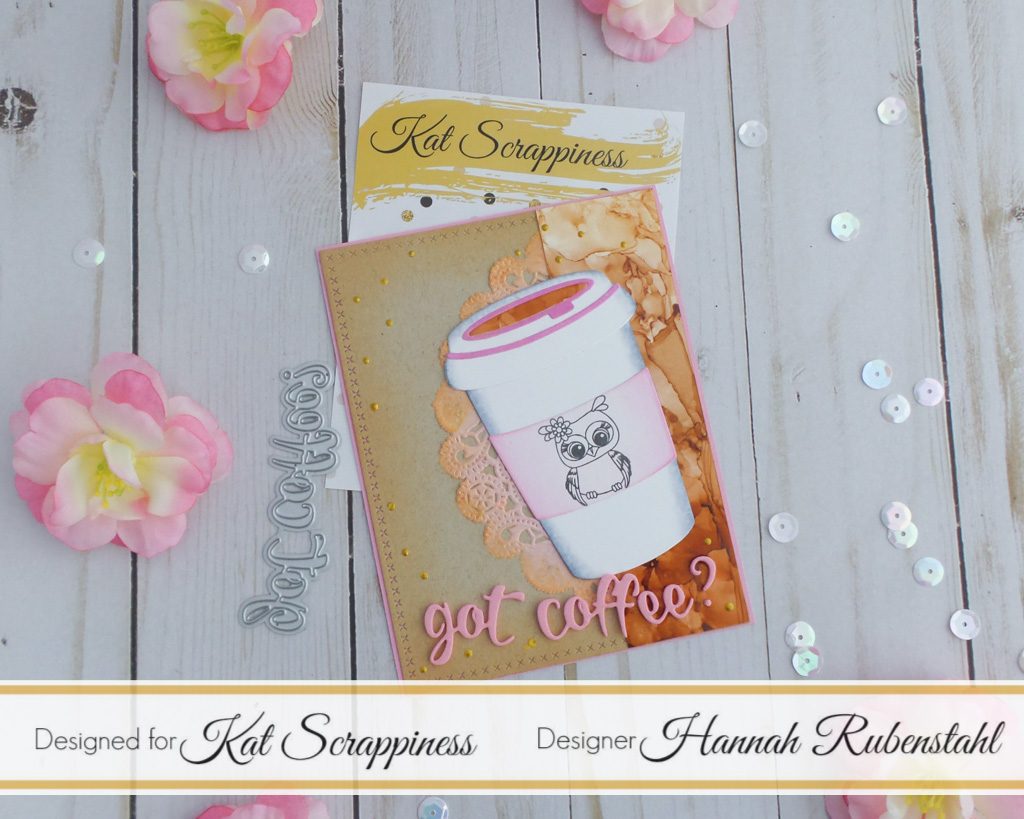
Recently she came up with two brand new products in her line that were both coffee related. Her “Got Coffee” die and her new Layered Coffee Cup die are two of the newest Kat Scrappiness brand products in her shop. Today’s card is using both of those, as well as a stamp from another new KS product: Owl Envelope Art stamp set.
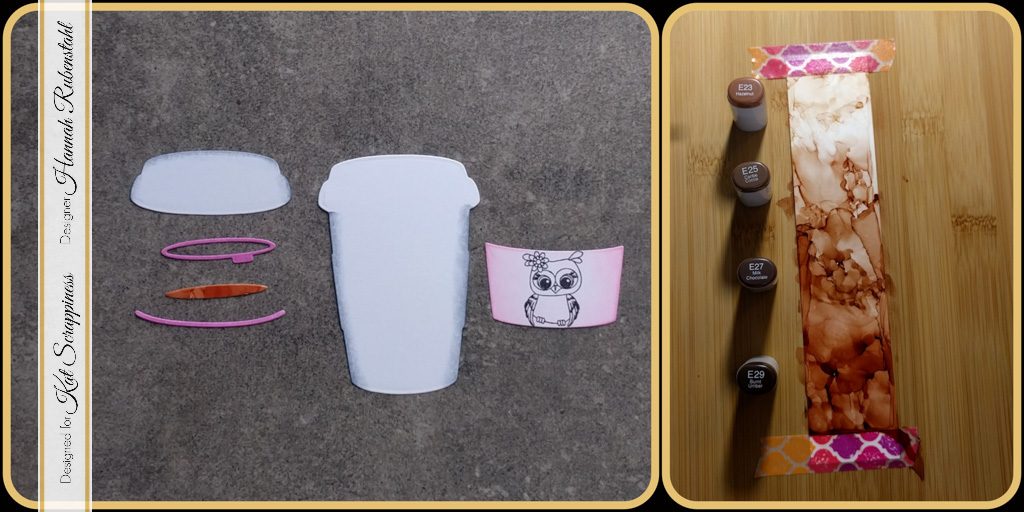
First, I die cut the coffee cup bits out of Neenah Solar White cardstock. For the center portion of the cup, where a logo might go, I lightly dusted it all over with Altenew’s Rose Quartz and the edges with Altenew’s Puffy Heart. In the center of this, I stamped the small owl from the Owl Envelope Art stamp set. I also covered some of the small portions of the lid with the same Altenew inks.
Next, using some light grey Copic markers I created a curved or shadowed effect. Basic Copic coloring rules applied here, sticking with either a W, C, or N and then using alternating colors. I relied heavily on the “0” to ensure a smooth transition to white.
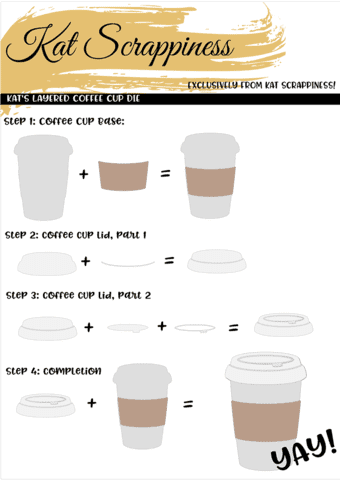
Using a liquid adhesive, Ranger Multi Medium Matte, I layered most of my coffee cut bits and adhered them together. If you are confused as to how to go about building the cup, there is a fabulous guide Kat has put together:
Then came the fun part! Playing with Yupo paper and Copic markers! You can see my video here:
Taking some Neenah Desert Storm paper I cut out the largest rectangle from the Cross Stitched Rectangle dies. Along the edges gently dusted the beautiful Delicata Golden Glitz. Using the same Delicata ink I performed the same technique on a light pink doily I had.
Using pink fun foam I cut out the “got coffee” sentiment. As it turned out the pink in the foam was pretty much the same pink in the doily and a complimentary one to the other pinks in the cup, therefore I left the foam naked and didn’t cover it with adhesive and paper.
I trimmed my Yupo paper down to an A2 length and die cut out the inner portion of my cup. This die cut portion was a total mistake on my part, I didn’t have the plans above when I was crafting the card. However, I like how it tied the cup in with the background, created movement in my card, and looked like coffee!
I layered everything on top of a light pink A2 card front using my favorite dot runner and Ranger Multi Medium Matte, then finished off the look by sparkling gold dots everywhere.
I rather like the final look of this card! If you like it and are in need of any of the following products please feel free to use my discount code HANNAH10 at checkout!
Products Used:
Layered Coffee Cup die by Kat Scrappiness
“Got Coffee?” sentiment die by Kat Scrappiness
Owl Envelope Art stamp set by Kat Scrappiness
Cross Stitched Rectangle die by Kat Scrappiness
Delicata Golden Glitz Ink
Ranger Multi Medium Matte Adhesive
Yupo Paper
Fun Foam
Neenah Solar White in 80 and 110lb
Neenah Desert Storm in 80lb
Momento Tuxedo Black
Are you participating in our monthly challenges? Each month we have a new challenge whose theme is picked out from our Design Team members. You create your project, based on the theme, and making sure you use at least one Kat Scrappiness product and you could win a $25 store discount! This month’s link can be found above, at the top of this page, or here!
This has been Hannah Rubenstahl, from Fanciful Spaces, hoping you have an epic crafting day.


No Comments