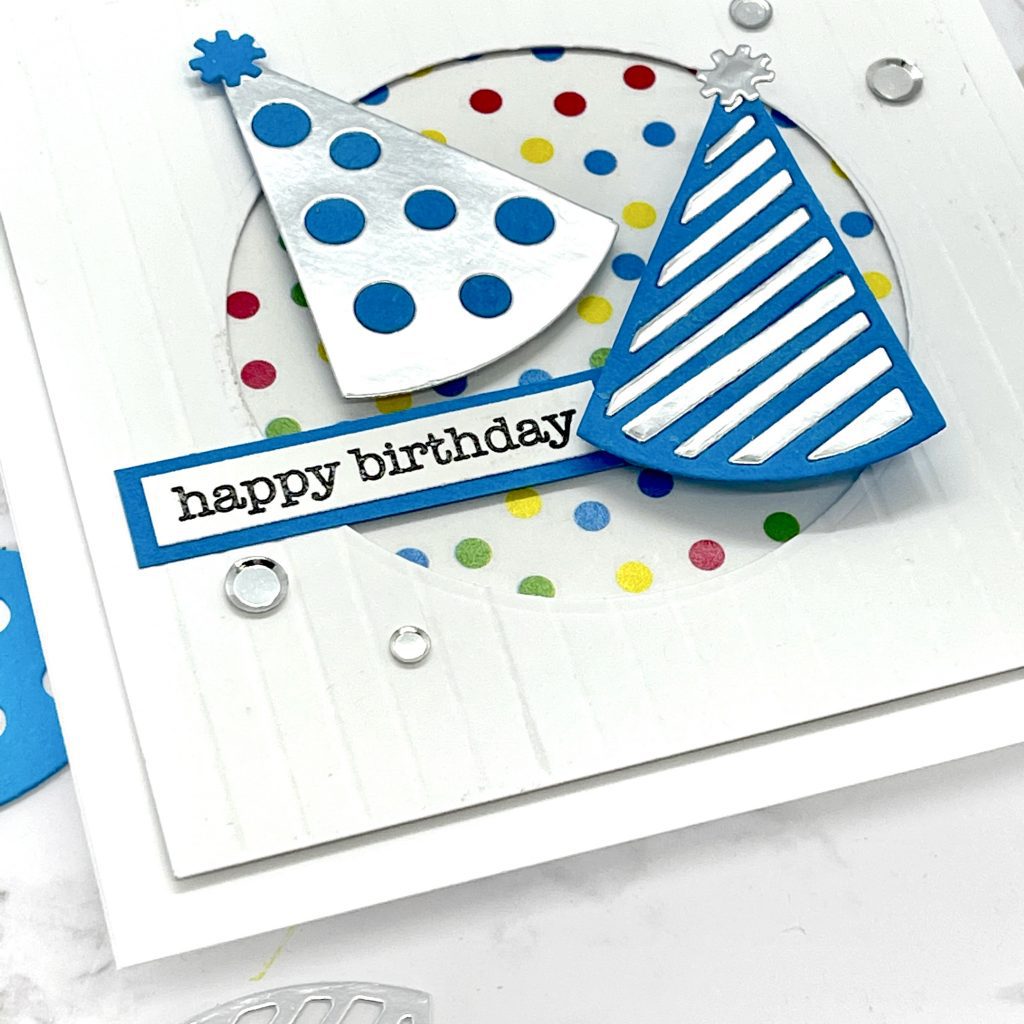
Good Morning, Kathy here with some new inspiration for you. The new Birthday Essentials die set from Kat Scrappiness provides many elements to create beautiful birthday cards. Today’s card is a bit interactive as I added a wobble. I think it is so fun and hope you do too! This was easy to create and a load of fun. Drop a comment below and let me know what you think of this card. The Birthday Essentials die set can be found here and I encourage you to check it out as I don’t think it will be available for long! Now it’s time to make a card!

CARD SUPPLIES
- Kat Scrappiness Birthday Essentials die set
- Kat Scrappiness Birthday Essentials Paper Pack 6 x 8
- Kat Scrappiness Everyday Brush Strokes stamp set (sentiment)
- Kat Scrappiness Silver Round Confetti
- Neenah Classic Crest 110lb card stock
- Colored card stock
- Paper Cutter
- Die-cutting machine
- Glue
- Foam
[youtube https://www.youtube.com/watch?v=zSsBl0gtNjQ]
CARD DETAILS
- Cut, score, and fold a 5″ x 5″ card base.
- Cut a panel from white card stock measuring 4.5″ x 4.5″.
- Add some interest to this panel by using an embossing folder or just score lines every 1/4″ like I did.
- With a 3″ circle die, center, and die-cut from the smaller panel.
- With a slightly larger die, cut a circle from the Birthday Essentials Paper Pack.
- Die-cut your birthday hats from the Birthday Essentials die set. I cut 4 hats. Two from silver and two from blue card stock. But if you just want to use patterned paper behind your hats you only need two.
- Trace the hat onto a piece of white card stock and cut it out two times. This will be glued to the back of the hat if you are inlaying your small die-cut elements. If you are using patterned paper trace the hats and glue the patterned paper to the back of the die-cut hats.
- I took the inside die pieces from one hat and inlaid them into the other hat. So on this card I took the blue dots and inlaid them into the silver hat with dots, then the silver stripes were inlaid into the blue hat.
- Tape your larger patterned circle to the back of the main card panel with low-tack tape. Add glue ONLY to the circle. Then, center the main panel onto the card base and press down on the circle. This will get you perfect placement for the larger circle. (Remember to remove the low tack tape)
- Layout your hats. To one of the hats, I added foam tape to pop it up. I added a little wobble piece to the second hat and adhered to that.
- I stamped the sentiment in Versafine Nocturne Clair black ink from the Everyday Brushstrokes stamp set. I then embossed with clear embossing powder and heated. I cut the sentiment with my paper cutter then cut a slightly larger rectangle from blue card stock. Glue these together and add to your card. Where the sentiment was touching the card I used liquid glue. Then I put a small piece of foam behind the area touching the patterned circle.
- Add a few silver confetti and the card is done.
As always, I thank you for visiting my blog today and would love for you to subscribe to it. Make sure you stop over and check out the new release at the Kat Scrappiness Shop. It is an amazing release!


No Comments